
Blog
Swagger Annotation and Spring Configuration


In the previous blog post ‘Swagger Specification and Code Generation one-o-one’, we learned about Swagger specification and its power to speed up web application development by code generator tool swagger-codegen. In this article, we will explore second approach of development using Swagger i.e. Bottom up approach where in services (REST Controllers) are first created and then Swagger core is used to generate definitions automatically. To understand Swagger file configuration better, let’s take an example of Spring REST application which facilitates user to book doctor’s appointment. Steps to configure We will use the Springfox implementation of the Swagger specification. 1. Adding maven dependency in pom.xml
<dependency>

<groupId>io.springfox</groupId>

<artifactId>springfox-swagger2</artifactId>

<version>2.4.0</version>

</dependency>

Add below dependency to use Swagger UI

<dependency>

<groupId>io.springfox</groupId>

<artifactId>springfox-swagger-ui</artifactId>

<version>2.4.0</version>

</dependency>
2. Enable matrix variables (not required in Spring 4.1)
Add <mvc:annotation-driven enable-matrix-variables="true"/> in spring-mvc-config.xml
3. Configure Docket configuration bean Docket class is basically a builder which is meant to be primary interface for Spring - Swagger integration
- Docket XML Configuration:
- To Use plugin, we should create Java configuration class with @Configuration class and define this class in application context file.
@EnableSwagger2

public class ApplicationSwaggerConfig {

@Bean

public Docket api() {

return new Docket(DocumentationType.SWAGGER_2)

.select().apis(RequestHandlerSelectors.basePackage("  com.swagger.demo"))

.paths(PathSelectors.any())

.build()

.pathMapping("/api");

}

}
- Add <mvc:annotation-driven/> in application context file
- Add <context:component-scan base-package=" com.swagger.demo"> in application context file
- Docket Java Configuration:
- Use the@EnableSwagger or @EnableSwagger2 annotation
- Define Docket instances using springs@Bean annotation
 @EnableSwagger2

@ComponentScan("com.swagger.demo")

public class ApplicationSwaggerConfig {

@Bean

public Docket api() {

return new Docket(DocumentationType.SWAGGER_2)

.select()

.apis(RequestHandlerSelectors.basePackage(("com.swagger.demo")))

.paths(PathSelectors.any())

.build()

.pathMapping("/api");

}

}
Select() => This method returns an instance of ApiSelectorBuilder, which provides a way to control the endpoints. RequestHandlerSelectors allows to filter the API according to the base package, class annotation, and method annotations. PathSelectors provides additional filtering which scans the request paths of your application. You can use any(), none(), regex(), or ant(). pathMapping(java.lang.String path) => This docket class method is to add a servlet path mapping 4. Enable Swagger UI XML configuration:
<mvc:resources mapping="swagger-ui.html" location="classpath:/META-INF/resources/"/>

<mvc:resources mapping="/webjars/**" location="classpath:/META-INF/resources/webjars/"/>
Java Configuration: You must create a class that extends WebMvcConfigurerAdapter, and is annotated with @EnableWebMvc and add below method @Override public void addResourceHandlers(ResourceHandlerRegistry registry) { registry.addResourceHandler("swagger-ui.html") .addResourceLocations("classpath:/META-INF/resources/"); registry.addResourceHandler("/webjars/**") .addResourceLocations("classpath:/META-INF/resources/webjars/"); } 5. Testing URL Swagger endpoints can be accessed at
- Testing Swagger API documentation
http://localhost:8080//swagger-ui.html
- Testing Swagger UI
http://localhost:8080//v2/api-docs Check below configuration of Doctor Appointment Booking Code snippet of operation Id: Get AppointmentBy DoctorID
@Api(description = "Doctors Appointment Operation", value = "/appointment")
@Controller
@RequestMapping(value = "/appointments")
public class DoctorAppointmentController {
@Autowired
AppointmentServiceImpl appointmentServiceImpl ;
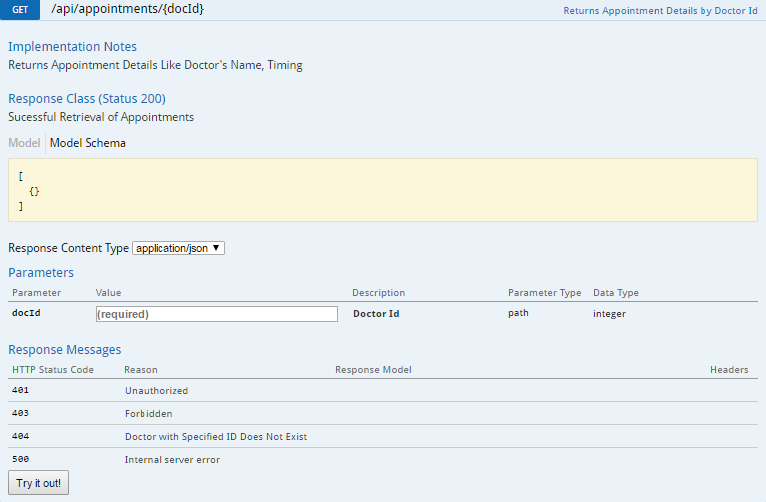
@ApiOperation(value = "Returns Appointment Details by Doctor Id", notes = "Returns Appointment Details Like Doctor's Name, Timing", response = ArrayList.class,
authorizations = {@Authorization(value="appointoauth",scopes = {@AuthorizationScope(scope = "get:appointments", description = "Allows Fetching Appointments")})})
@ApiResponses(value = { @ApiResponse(code = 200, message = "Sucessful Retrieval of Appointments", response = ArrayList.class ) ,
@ApiResponse(code = 404, message = "Doctor with Specified ID Does Not Exist"),
@ApiResponse(code = 500, message = "Internal server error")})
@ApiImplicitParams(value = {@ApiImplicitParam(name = "docId", value = "Doctor Id", required = true, dataType = "int", paramType = "path")})
@RequestMapping(value = "/{docId}", method = RequestMethod.GET, produces = MediaType.APPLICATION_JSON_VALUE)
@ResponseBody
public List<Slot> getAppointmentByDoctorID(@PathVariable int docId){
return appointmentServiceImpl.getAppointmentByDoctorID(docId);
}//other methods
}
Model: MovieBean
@ApiModel(value = "Slot" , description = "Prototype for booking appointment")

public class Slot {

@ApiModelProperty(value = "Slot Id" , position = 1 , required = true)

private int  slotId;

@ApiModelProperty(value = "Start Time" , position = 2 , required = true)

private String startTime;

@ApiModelProperty(value = "Appointment Date" , position = 3 , required = true)

private Date appointmentDay;

@ApiModelProperty(value = "End Time" , position = 4 , required = true)

private String endTime;

@ApiModelProperty(value = "Doctor Id" , position = 5 , required = true)

private int doctorId;

//getters and setters

}
Resource Declaration:
- @Api => This is used to declare Swagger resource. This is class/Interface/Enum level annotation. Types annotated with @Api will be scanned by Swagger
Operation Declarations:
- @ApiOperation => This is method level annotation. Only methods that are annotated with @ApiOperation will be scanned and added the API Declaration
- @ApiResponses => Method level annotation and it describes a concrete possible response
- @ApiResponse => Method level annotation and cannot be used directly on the method and needs to be included in the array value of @ApiResponses
- @ApiImplicitParam and @ApiImplicitParams => Method level annotation which describes operation parameters manually
- @Authorization, @AuthorizationScope => These annotations are used as input to @Api and @ApiOperation only, and not directly on the classes and methods
In this case we declare that the getAppointmentByDoctorID operation uses the appointoauth authorization scheme. Then using the @AuthorizationScope we fine-tune the definition by saying it requires the get:appointments scope. You can see that @AuthorizationScope is used as an input to @Authorization. Model Declarations:
- @ApiModel => This is class/Interface/Enum level annotation. It describes model classes. It also supports polymorphism and inheritance through elements discriminator and subtypes.
Discriminator is a distinguishing field of top model and subtypes includes all inherited classes.
- @ApiModelProperty => Describes model properties and allows controlling Swagger-specific definitions such as allowed values. It also offers additional filtering properties in case you want to hide the property in certain scenarios.
Documentation We are all set to test documentation now. When you hit documentation URL i.e. http://localhost:8080/swaggerdemo/v2/api-docs User can view API documentation generated which is exactly the reverse of what happens in top down approach where in first specification is created and then services are generated using tool codegen. Please click here to revisit top down approach. Below is specification generated for Doctor Booking Appointment application.
{

"swagger": "2.0",

"info": {

"description": "Api Documentation",

"version": "1.0",

"title": "Api Documentation",

"termsOfService": "urn:tos",

"contact": {},

"license": {

"name": "Apache 2.0",

"url": "http://www.apache.org/licenses/LICENSE-2.0"

}

//Paths

//Operations

//definitions

}
You can download whole specification here. Swagger UI Testing: You can test Swagger UI in browser by visiting http://localhost:8080/swaggerdemo/swagger-ui.html Below are all operations listed. 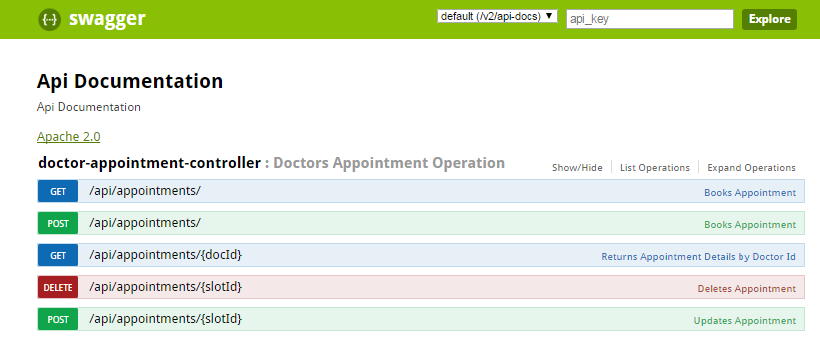
 Now you can keep on implementing services, operations and have your code and document in sync. In the next blog of series, we will explore other exciting features of Swagger. Stay tuned! References: Springfox.github.io
Github.com


Get Started


