
Blog
Microservices Security Using JWT Authentication Gateway
Blog
Microservices Security Using JWT Authentication Gateway


Introduction
This blog provides a deep dive on the use of an Authentication Gateway for providing secured access to Microservices. It describes how the Gateway uses JSON Web Token(JWT) for authenticating clients that want to access web service endpoints hosted by different Microservices.
JSON Web Token (JWT)
As per RFC 7519, JWT is a compact and self-contained way for secure transmission of information between different entities as a JSON object. The token is composed of 3 parts: header, payload and signature; each separated by a dot as mentioned in below format:
header.payload.signature
Header
The header typically consists of two parts:
- Type of Token i.e. JWT
- Hashing algorithm being used e.g. HMAC SHA256 or RSA
e.g.
{
  "alg": "HS256",
  "typ": "JWT"
}
The first part of the JWT is formed by Base64Url encoding of the Header JSON.
Payload
The payload contains the ‘claims’ i.e. the data that‘s stored inside the JWT. Claims are information about an entity (typically, the user) and additional data.
e.g.
{
 "sub": "1234567890",
 "name": "Mark",
 "admin": true,
 "iss": http://abc.com,
 "iat": 1472033308,
 "exp": 1472034208
}
The second part of the JWT is formed by Base64Url encoding of the payload.
Signature
The signature is created by signing the encoded header & encoded payload with a secret key using the algorithm specified in the header.
e.g. For HMAC SHA256 algorithm, the signature will be created as below:
HMACSHA256(
base64UrlEncode(header) + "." +
base64UrlEncode(payload),  secret)
After combining all JWT components together, a typical JWT token looks like below.
eyJ0eXAiOiJKV1QiLCJhbGciOiJIUzI1NiJ9.
eyJ1c2VySWQiOiJiMDhmODZhZi0zNWRhLTQ4ZjItOGZhYi1jZWYzOTA0NjQifQ.
-xN_h82PHVTCMA9vdoHrcZxH-x5mb11y1537t3rGzcM
The JWT token should be sent in the Authorization header using the Bearer schema for accessing a protected resource as shown below:
Authorization: Bearer <JWT token>
JWT Advantages
- JWT uses JSON which is less verbose than XML & therefore smaller in size making it more compact than Security Assertion Markup Language Tokens (SAML)
- It is easier to work with JWT than SAML assertions as JSON parsers are common in most programming languages but XML doesn't have a natural document-to-object mapping.
System Architecture
The system is implemented as a bunch of Spring Boot applications communicating with each other. Apache Maven is used as a dependency & build tool for the applications. The system components are best understood from the below workflow diagram.
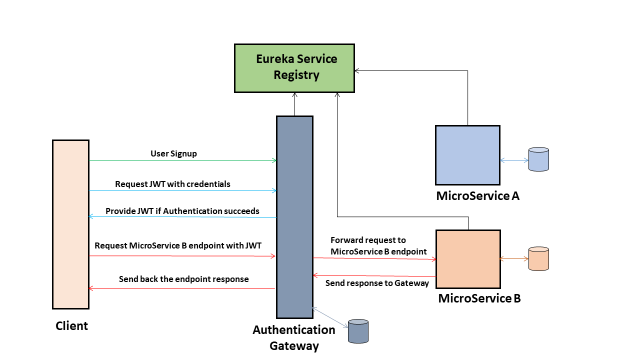
System Components & description:
- Client
It can be any Web service consumer on any platform. Simply put it can be another Webservice, UI application or Mobile platform which wants to read-write data in a secure way with an Application having various Microservices. Typically, the Client requests shown in the above workflow diagram can be REST API requests invoked from any REST client.
- Eureka Service Registry
The Eureka service registry is another Microservice that primarily handles the communication of different Microservices. As each Microservice registers itself in the Eureka server, it must be highly available since every service communicates with it to discover other services. Below is the configuration for a typical Eureka server.
pom.xml
<dependencies>
   <dependency>
      <groupId>org.springframework.cloud</groupId>
      <artifactId>spring-cloud-starter-eureka-server</artifactId>
   </dependency>
</dependencies>
application.yml
server:
  port: ${PORT:8761}
 eureka:
  instance:
    hostname: localhost
  client:
    registerWithEureka: false
    fetchRegistry: false
    serviceUrl:
      defaultZone: http://${eureka.instance.hostname}:${server.port}/eureka/
@SpringBootApplication
@EnableEurekaServer
public class EurekaServerApplication {
    public static void main(String[] args) {
        SpringApplication.run(EurekaServerApplication.class, args);
    }
}
Navigating the browser to http://localhost:8761 shows the Eureka dashboard, where one can inspect the registered Microservice instances & other status information.
3.MicroServices A & B
These are the Microservices that host various REST endpoints namely GET/POST/PUT/DELETE for different resources of the application. Each Microservice is a Eureka client application & must register itself with the Eureka Server. Below is the configuration for MicroserviceA that is hosted on port 8082 with some REST endpoints.
pom.xml
<dependencies>
   <dependency>
      <groupId>org.springframework.boot</groupId>
      <artifactId>spring-boot-starter-web</artifactId>
   </dependency>
   <dependency>
      <groupId>org.springframework.cloud</groupId>
      <artifactId>spring-cloud-starter-eureka</artifactId>
   </dependency>
</dependencies>
application.yml
server:
  port: ${PORT:8082}
spring:
  application:
    name: greeting-service
eureka:
  client:
    fetchRegistry: true
    serviceUrl:
      defaultZone: http://localhost:8761/eureka/
@SpringBootApplication
@EnableDiscoveryClient
@RestController
@RequestMapping("/greetings")
public class MicroServiceA {
    @GetMapping
    public String fetchGreeting() {
        return "Hello from MicroServiceA";
    }
    @PostMapping
    public String addGreeting(@RequestBody String greeting) {
         // Business logic to save the greeting typically to a DB table
         return "Greeting successfully saved";
    }
    public static void main(String[] args) {
        SpringApplication.run(MicroServiceA.class, args);
    }
}
On similar lines, MicroserviceB can be configured on another port to host other REST endpoints.
4.Authentication Gateway
The Gateway is implemented as a Microservice using Spring Cloud Zuul Proxy & Spring Security APIs. It handles centralized authentication & routing client requests to various Microservices using the Eureka service registry. It acts as a proxy to the clients abstracting the Microservices architecture & must be highly available as it works as a single point of interaction for different operations be it user signup, user credentials authentication, generating & verifying JWT tokens & handling the client business requests by communicating to relevant Microservice endpoints. In short, it is a Request router that doubles up as an Authentication Microservice.
Alternatively, the User management features including different authentication mechanisms (JWT, OAuth) can also be hosted as a separate ‘User Management’ Microservice. In that case, the Gateway can just work as a lightweight request router & communicate with it for user authentication via the JWT tokens.
Below is the configuration for the Authentication Gateway.
pom.xml
   <dependency>
         <groupId>org.springframework.cloud</groupId>
         <artifactId>spring-cloud-starter-zuul</artifactId>
   </dependency>
   <dependency>
         <groupId>org.springframework.cloud</groupId>
         <artifactId>spring-cloud-starter-eureka</artifactId>
   </dependency>
   <dependency>
        <groupId>org.springframework.boot</groupId>
        <artifactId>spring-boot-starter-security</artifactId>
   </dependency>
   <dependency>
         <groupId>org.springframework.boot</groupId>
         <artifactId>spring-boot-starter-web</artifactId>
   </dependency>
   <dependency>
         <groupId>io.jsonwebtoken</groupId>
         <artifactId>jjwt</artifactId>
         <version>0.6.0</version>
   </dependency>
   <!—- Other dependencies -- >
application.yml
server:
  port: ${PORT:8081}
eureka:
  client:
    fetchRegistry: true
    serviceUrl:
      defaultZone: localhost:8761
zuul:
  routes:
    serviceA:
      path: /greetings-api/**
      serviceId: greeting-service
    serviceB:
      path: /tasks-api/**
      serviceId: task-service
application.properties
jwt.security.key=j3H5Ld5nYmGWyULy6xwpOgfSH++NgKXnJMq20vpfd+8=t
The JWT secret key is used during the signing of the JWT token
@SpringBootApplication
@EnableDiscoveryClient
@EnableZuulProxy
public class ApiGatewayApplication{
    public static void main(String[] args) {
        SpringApplication.run(ApiGatewayApplication.class, args);
    }
    @Bean
    public BCryptPasswordEncoder passwordEncoder() {
        return new BCryptPasswordEncoder(); // For encrypting user password
    }
}
JWT Authentication Workflow
- Client registers with Authentication Gateway by supplying the username & password through the POST URI /users/signup (which is permitted for public access without any security)
Web security configuration
@Configuration
@EnableWebSecurity
@EnableGlobalMethodSecurity(prePostEnabled = true)
public class WebSecurityConfig extends WebSecurityConfigurerAdapter {
    @Resource(name = "userService")
    private UserDetailsService userDetailsService;
    @Autowired
    private JwtAuthenticationEntryPoint unauthorizedHandler;
    @Autowired
    private BCryptPasswordEncoder passwordEncoder;
    @Override
    @Bean
    public AuthenticationManager authenticationManagerBean() throws Exception{
        return super.authenticationManagerBean();
    }
    @Autowired
    public void globalUserDetails(AuthenticationManagerBuilder auth) throws
             Exception {
        auth.userDetailsService(userDetailsService)
                .passwordEncoder(passwordEncoder);
    }
    @Bean
    public JwtAuthenticationFilter authenticationTokenFilterBean() throws
              Exception {
        return new JwtAuthenticationFilter();
    }
    @Override
    protected void configure(HttpSecurity http) throws Exception {
        http.cors().and().csrf().disable()
            .authorizeRequests()
            .antMatchers("/token/*","/users/signup").permitAll()
            .anyRequest().authenticated()
            .and()
            .exceptionHandling().authenticationEntryPoint(unauthorizedHandler)
            .and()
            .sessionManagement()
            .sessionCreationPolicy(SessionCreationPolicy.STATELESS);
       http.addFilterBefore(authenticationTokenFilterBean(),
   UsernamePasswordAuthenticationFilter.class);
    }
}
UserController
@RestController
@RequestMapping("/users")
public class UserController {
    @Autowired
    private UserService userService;
    @PostMapping("/signup")
    public User saveUser(@RequestBody LoginUser user){
      return userService.save(user);
    }
    // Other methods
}
Here UserService is an implementation of Spring Security’s UserDetailsService & the password is encrypted using BCryptPasswordEncoder before storing it into the DB.
@Service(value = "userService")
public class UserServiceImpl implements UserDetailsService, UserService {
   @Autowired
   private UserRepository userDao;
   @Autowired
   private BCryptPasswordEncoder passwordEncoder;
   @Override
   public User save(LoginUser user) {
         User newUser = new User();
         newUser.setUsername(user.getUsername());
         newUser.setPassword(passwordEncoder.encode(user.getPassword()));
         return userDao.save(newUser);
    }
   public UserDetails loadUserByUsername(String userId) throws
               UsernameNotFoundException {
         User user = userDao.findByUsername(userId);
         if(user == null){
            throw new UsernameNotFoundException("Invalid username or password.");
         }
         return new org.springframework.security.core.userdetails.User(
            user.getUsername(), user.getPassword(), getAuthority());
         }
  // Other service methods
2.Client requests an ‘Access token’ from Authentication Gateway through the POST URI /token/generate-token by sending their credentials.
3.The Authentication Gateway verifies the credentials & upon successful authentication generates a JWT access token containing user details and permissions. This token is sent as a response to the client.
AuthenticationController
@RestController
@RequestMapping("/token")
public class AuthenticationController {
    @Autowired
    private AuthenticationManager authenticationManager;
    @Autowired
    private JwtTokenUtil jwtTokenUtil;
    @Autowired
    private UserService userService;
    @RequestMapping(value = "/generate-token", method = RequestMethod.POST)
    public ResponseEntity<?> generateToken(@RequestBody LoginUser loginUser)
              throws AuthenticationException {
        final Authentication authentication = authenticationManager.authenticate(
                new UsernamePasswordAuthenticationToken(
                        loginUser.getUsername(),
                        loginUser.getPassword()
                )
        );
        SecurityContextHolder.getContext().setAuthentication(authentication);
        final User user = userService.findOne(loginUser.getUsername());
        final String token = jwtTokenUtil.generateToken(user);
        return ResponseEntity.ok(new AuthToken(token));
    }
}
JwtTokenUtil
@Component
public class JwtTokenUtil implements Serializable {
    @Value("${jwt.security.key}")
    private String jwtKey;
    private String doGenerateToken(String subject) {
        Claims claims = Jwts.claims().setSubject(subject);
        return Jwts.builder()
                .setClaims(claims)
                .setIssuer("http://jwtdemo.com")
                .setIssuedAt(new Date(System.currentTimeMillis()))
                .setExpiration(new Date(System.currentTimeMillis() +
                          ACCESS_TOKEN_VALIDITY_SECONDS*1000))
                .signWith(SignatureAlgorithm.HS256, jwtKey)
                .compact();
    }
   // Other methods
}
Here client will invoke below POST request to obtain an access token having a validity of configured time (few minutes to few hours):
Sample Request Body:
{
    "username": "admin",
    "password": "password"
}
JWT access token returned by Authentication Gateway
eyJhbGciOiJIUzI1NiJ9.eyJzdWIiOiJhZG1pbiIsInNjb3BlcyI6W3siYXV0aG9yaXR5IjoiUk9MRV9VU0VSIn0seyJhd
XRob3JpdHkiOiJST0xFX0FETUlOIn1dLCJpc3MiOiJodHRwOi8vand0ZGVtby5jb20iLCJpYXQiOjE1MTg3NjM0N
TUsImV4cCI6MTUxODc4MTQ1NX0.t8UUBrhYx6lUAunl5R-s17IxZXOZ1yYGLwV0Sdiw4QY
4.Client then sends the Access token in an Authorization header in each REST API request to the Authentication Gateway.
e.g. To access the GET URI ‘greetings’ using below details:
URL: http://localhost:8081/greetings-api/greetings
Authorization Header: Bearer
eyJhbGciOiJIUzI1NiJ9.eyJzdWIiOiJhZG1pbiIsInNjb3BlcyI6W3siYXV0aG9yaXR5IjoiUk9MRV9VU0VSIn0seyJhd
XRob3JpdHkiOiJST0xFX0FETUlOIn1dLCJpc3MiOiJodHRwOi8vand0ZGVtby5jb20iLCJpYXQiOjE1MTg3NjM0N
TUsImV4cCI6MTUxODc4MTQ1NX0.t8UUBrhYx6lUAunl5R-s17IxZXOZ1yYGLwV0Sdiw4QY
5.Authentication Gateway retrieves the access token from Authorization header in the client request and validates the signature. If the signature is valid it routes the request to the matching endpoint (Microservice) based upon the routes which are configured in application.yml or application.properties. Microservice level authorization can also be handled through the JwtAuthenticationFilter.
e.g. All endpoints of MicroserviceA can be accessed by users having ADMIN role only
JwtAuthenticationFilter
@public class JwtAuthenticationFilter extends OncePerRequestFilter {
    @Autowired
    private UserDetailsService userDetailsService;
    @Autowired
    private JwtTokenUtil jwtTokenUtil;
    @Override
    protected void doFilterInternal(HttpServletRequest req, HttpServletResponse
                 res, FilterChain chain) throws IOException, ServletException {
        String header = req.getHeader(HEADER_STRING);
        String username = null;
        String authToken = null;
        if (header != null && header.startsWith(TOKEN_PREFIX)) {
            authToken = header.replace(TOKEN_PREFIX,"");
            try {
                username = jwtTokenUtil.getUsernameFromToken(authToken);
            } catch (IllegalArgumentException e) {
                logger.error("An error occured during getting username from
                          token", e);
            } catch (ExpiredJwtException e) {
                logger.warn("Token is expired and not valid anymore", e);
            } catch(SignatureException e){
                logger.error("Authentication Failed. Username or Password not
                          valid.");
            }
        } else {
            logger.warn("Couldn't find bearer string, will ignore the header");
        }
        if (username != null &&
                 SecurityContextHolder.getContext().getAuthentication() == null) {
            UserDetails userDetails =
                          userDetailsService.loadUserByUsername(username);
            if (jwtTokenUtil.validateToken(authToken, userDetails)) {
                UsernamePasswordAuthenticationToken authentication = new
                     UsernamePasswordAuthenticationToken(userDetails, null, null);
                authentication.setDetails(new
                     WebAuthenticationDetailsSource().buildDetails(req));
                logger.info("Authenticated user " + username + ", setting security
                          context");
                SecurityContextHolder.getContext().setAuthentication(
                          authentication);
            }
        }
        chain.doFilter(req, res);
    }
}
6.The gateway can also send extra parameters in the request header (JWT token, other user information etc.) through custom Zuul Filters.
PreFilter
public class PreFilter extends ZuulFilter {
    private static Logger log = LoggerFactory.getLogger(PreFilter.class);
    @Override
    public String filterType() {
        return "pre";
    }
    @Override
    public int filterOrder() {
        return 1;
    }
    @Override
    public boolean shouldFilter() {
        return true;
    }
    @Override
    public Object run() {
        RequestContext ctx = RequestContext.getCurrentContext();
        HttpServletRequest request = ctx.getRequest();
         // Add a custom header in the request
        ctx.addZuulRequestHeader("Authorization",
                 request.getHeader("Authorization"));
        log.info(String.format("%s request to %s", request.getMethod(),
                 request.getRequestURL().toString()));
        return null;
    }
}
7.The Micro service then can optionally authorize the request & provides the response to the Authentication Gateway.
For Authorization, the Microservice would need the JWT access token to be passed to it. It can then verify the JWT token & extract the user roles from the claims & accordingly allow/deny the request for the concerned endpoint.
e.g. For authorizing only users with ADMIN role to access the REST endpoint for ‘addGreeting’ in MicroServiceA, it can be annotated as below.
    @PostMapping
    @PreAuthorize("hasRole('ROLE_ADMIN')")
    public String addGreeting(@RequestBody String greeting) {
         // Business logic to save the greeting typically to a DB table
         return "Greeting successfully saved";
    }
8.The Gateway then can optionally add any other header to the response using a ‘post’ Zuul filter & send it back to the client.
Conclusion
JWT Authentication Gateway provides very a useful approach for securing Microservices applications with minimal impact to the Microservices code. Thus, application developers can focus on the core business logic without worrying about the security mechanism that guards the application. It can be independently scaled and deployed for performing load testing & maintaining high availability. It can also serve as a centralized entity for other cross-cutting concerns like Microservices monitoring, routing rules etc.
Further Reading and Next Steps:
- Provide a mechanism of fault tolerance for Microservices using Hystrix
- Prevent the ‘User Signup’ URL from abuse i.e. prevent attackers from misusing it or provide a limit on the number of signups per minute/hour etc.
- Provide endpoints for ‘Password Reset’ & ‘Forgot Password’ to the client
- JWT Refresh tokens
- Provide API documentation for each Microservice using Swagger
References:
Found this Xoriant blog interesting? To get more insights on the recent technology trends and thought leadership, Visit Our New Blogs or Xoriant Home Page